Inventor – Consistently and Efficiently Calculate Finished Surface Areas
One challenge that pops up from time to time is how to calculate a component’s finished surface area. Inventor will automatically calculate the total surface area in the Physical iProperties, but in many cases, the entire part does not require painting. Therefore, it is important to determine a consistent approach to calculate the surface area, so that we can repeat this process across an entire design. In this blog post, we’ll explore a process utilizing generated surfaces and an iLogic rule to consistently compute the surface area.


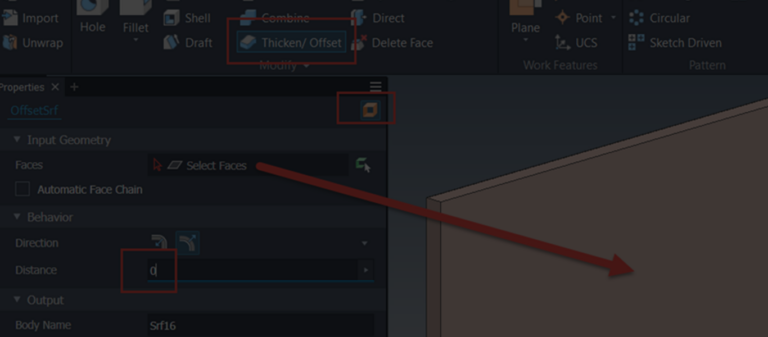
The first step in the process is to determine the surfaces of a component that receive a finish. The method that I have chosen is to utilize the “Thicken/Offset” tool to create an offset surface from each portion of the part that gets a finish. It is important that the offset distance is 0. Please note that you may need to split one of the original part faces to accurately compute the finished surfaces.

Utilize the Thicken/ Offset tool to create surfaces offset by a distance of 0
Because there could be other surfaces in a component, it is important to specifically designate these surfaces specifically as the finished surfaces. I utilize the “Stitch” command to group all these surfaces together. One advantage of this approach is the “Stitch” command can be modified later. This will probably never happen to you, but sometimes I forget a surface, so it’s great to have the ability to add or remove a surface from the collection.
IMPORTANT NOTE: Be sure to name the “Stitch” group of surfaces consistently, so this process can be implemented in all desired designs. I have chosen to name the feature “Finish_Surfaces”.

Utilize the “Stitch” tool and select all the surfaces to join together

Be sure to name the “Stitch” feature consistently, such as “Finish_Surfaces”
The final element of the solution is to calculate the area of the surfaces and report that value in a useful manner. I decided to utilize iLogic for the flexibility that it affords us to perform the calculations and create parameters and iProperties. In the code shown below, the calculated surface area is reported as a User Parameter and a Custom iProperty. Please note that this rule could be implemented as an “External Rule” for superior efficiency as the same rule could be used across all parts.
iLogic Code:
Dim oDoc = ThisDoc.Document
Dim oCompDef As PartComponentDefinition = oDoc.ComponentDefinition
Dim oSurfaceArea As Double
oSurfaceArea = 0
‘Cycle through the part and capture the “Finish_Surfaces” Knit Feature
For Each oFeature In oCompDef.Features
If oFeature.Type = kKnitFeatureObject And oFeature.Name = “Finish_Surfaces”
For Each oFace In oFeature.Faces
oSurfaceArea = oSurfaceArea + oFace.Evaluator.Area
Logger.Info(oFace.Evaluator.Area)
Logger.Info(oSurfaceArea)
Next
End If
Next
‘Convert the oSurfaceArea to square inches, as the value is cm^2 from Inventor
‘I’ll use the brute force method and simply divide the value by 2.54 * 2.54
oSurfaceArea_Inch = oSurfaceArea / (2.54 * 2.54)
Logger.Info(oSurfaceArea_Inch & “: is the total area, in inches”)
‘Set the SurfaceArea to a Parameter Value and set that to be an Exportable parameter / custom iProperty
‘Access the UserParameters object collection
oUserParameters = oCompDef.Parameters.UserParameters
Logger.Info(oUserParameters.Count)
‘If there are NO User Parameters, create the user parameter
If oUserParameters.Count = 0
‘Create the parameter if it doesn’t exist
oParameter = oUserParameters.AddByValue(“Finished_Surface_Area”, oSurfaceArea, “in in”) ‘Use “in in” since square inches isn’t a defined unit
‘and it will Convert From cm^2
‘Set the parameter to be exposed as a custom iProperty
oParameter.ExposedAsProperty = True
End If
‘Cycle through the existing User Parameters and modify / create the “Finished_Surface_Area” parameter and set it as a custom iProperty
For Each oParameter In oUserParameters
If oParameter.Name = “Finished_Surface_Area”
Parameter(“Finished_Surface_Area”) = oSurfaceArea_Inch
‘Set the parameter to be exposed as a custom iProperty
oParameter.ExposedAsProperty = True
Else
Logger.Info(“Parameter does NOT exist.”)
‘Create the parameter if it doesn’t exist
oParameter = oUserParameters.AddByValue(“Finished_Surface_Area”, oSurfaceArea, “in in”) ‘Use “in in” since square inches isn’t a defined unit
‘and it will Convert From cm^2
‘Set the parameter to be exposed as a custom iProperty
oParameter.ExposedAsProperty = True
End If
Next
iLogicVb.UpdateWhenDone = True
So that’s the process. Put it all together and now one can calculate the amount of paint, or whatever finish, across an entire design. If you have any questions or comments, please let us know below. Happy blogging and have a most blessed day!
Link to YouTube Video:
Download the PDF file for this post!
Do you use any of these tips and tricks in your daily workflow? Feel free to brag about your success in the comments!
Like what you’ve read? Subscribe to our blog!
Feel free to share on Twitter or Facebook!


